The Help Manual

You will be creating a list of "How To's" for Microsoft Word. For example, if someone came to you and asked, "Joe, how do I cut and Paste something in Microsoft Word?", you would be able to hand them your Help Manual and they would be able to look up the steps to cut and paste.

Steps to completing the Help Manual:

  1. Open Microsoft Word
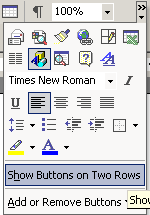
  2. Move your toolbars onto 2 rows. Click on the icon on the toolbar and select "Show buttons on two rows"

  3. Create a new file and save it as "(your name's) help manual"
  4. Include a title at the top of the page and put an interesting line border underneath the title.
  5. Change the margins to 0.5" for the top, bottom, left, and right.
  6. Insert the page numbers at the bottom center of the page (footer)
  7. Insert your name at the right of the Header
  8. Insert your period number (period 2) at the left of the header
  9. Go back to the Cover Page lesson and Copy the cheat sheet at the top of the page. This way you do not have to retype in the instructions for all of these features...
  10. Paste the instructions onto your help manual
  11. Turn the Show/Hide tool on
  12. Move to the bottom of the screen and make sure there are a couple (2) spaces below the table that was just pasted onto the page.
  13. Move your cursor to the line two spaces below the table
  14. Copy the cheat sheet from the newsletter lesson and paste it onto the help manual just below the stuff you just pasted. Now you have even more features of Microsoft Word in your help Manual.
  15. READ THIS: The point of the rest of this assignment is for you to learn how to write Technical Instructions. I will read your instructions and attempt to follow them. If I cannot follow them and have the computer do what you intend for me to be able to do, then you will have to rewrite the instructions. Be very specific and do not copy and paste from the old assignments. Write them in your own words.
  16. Below these two tables, you are going to have to create similar tables for the following sections listed below:
    • Tables
    • Images
    • Autoshapes
    • Hyperlinks and Tabs
  17. For each one of the sections listed above, you must add a minimum of 5 sets of instructions related to that category. For example, if you are working on the Tables Section, the you must explain the steps to (1) Create a table, (2) Change the size of a table, (3) Insert a row, (4) Delete a row, (5) Sort a table, (6) etc.
  18. Yes, you must also include the steps to actually complete the function. For Example:

    READ THIS: You must write these instructions in your own words. Do not copy and paste the instructions from previous lessons.

    HINT: When writing technical instructions, be very specific. Tell the reader exactly what to do each step of the way.

    Bad Example: Directions to get to the beach from Westview...
    Leave the parking lot and go to the freeway. Get on the freeway and go all the way to beach. Park your car.

    Good Example: Directions to the beach from the Westview...
    When leaving the parking lot, turn right. Go West on the 56 freeway. Exit at El Camino Real and continue straight underneath the freeway. Take this all the way to the beach and make a right into the parking lot. Park your car.

    HINT: When writing technical instructions, never assume that the reader knows what you mean. Tell them exactly what to do.

    Tables

    Insert a table Move you cursor to where you want the table/Go to Table/Insert Table/Select the number of rows and columns/Click OK
    Sorting a Table Your steps to sorting a table here....
    Inserting a Column Your steps to inserting a column here...
    Deleting a Row Your steps to deleting a row here...
    Merging Cells Your steps to merging cells here...

    Images

    Insert an Image Move you cursor to where you want the image/Go to Insert / picture/from file...Select the image/Click Insert
    Resizing an Image Your steps here....
    Wrapping an image Your steps here...
    Something else related to images Your steps here...
    something else related to images Your steps here...


  19. Your instructions, if followed by the instructor, should work. If they do not, then you will not get credit for them.
  20. Then, put a set of links (like the table of contents) at the top of the page that will jump to each section of your help manual. For example, put a link at the top of the page for Tables that will jump to the section for Tables.

    [Format] [Tables] [Images] [Etc.] [Etc.] [Etc.] [Etc.] [Etc.]
  21. Then make sure there are links that jump back from each section to the top of the document.
  22. Go to File > Properties > Summary Tab > Author: Type your GRID#
  23. Save your work.
  24. Open your Wolverine Way file.

    Think about what you have learned during this assignment (think about the standard and what is stated you would learn). Then, find the Wolverine Way poster somewhere in the room. Of the four main school-wide expectations, decide which one that this assignment has helped you to achieve. Choose a different Expectation than what you have already chosen. Write a minimum of three sentences that (1) describe what you learned AND (2) how it relates to that Schoolwide Expectation AND (3) describe a time in your life when you might apply this new knowledge.
  25. Save the Wolverine Way file and show your instructor both your Wolverine Way file and your Help Manual.